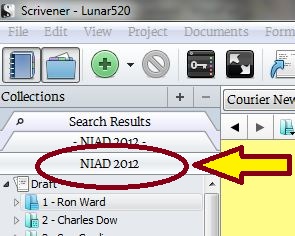
As part of the Novel In A Day excercises I make available the Scrivener project files used to create the books. As a result of seeing these, a couple of people have asked me how I changed the name of the binder in those files so that instead of just saying “Binder”, they read (for example) “NIAD 2012″…
Scrivener itself (well, Scrivener for Windows at least – I’ve no idea about the Mac version) doesn’t allow for this text string to be manually changed, but using external editors you can hack the project file to enable this to be renamed to reflect your latest opus.
The word “hack” in that last sentence should give you a clue, though. This is doing something outside of the normal order of things for Scrivener and involves messing about in the project file code. It’s all too easy to accidentally change something you shouldn’t and mess your project up. The makers of Scrivener aren’t likely to be too sympathetic if you destroy your project file attempting this, and I’m not going to accept any liabililty or responsibility either. Try this out on a dummy project first. After that, work only on back-ups of your works in progress. Basically the only response I’ll give is “delete the file and switch to the back up”. If you don’t have a back-up, that’s your look out.
So, that said… How do you go about it?
Step 1: Make a back up of your entire project folder.
Step 2: Go into the .scriv folder of your back up to find the project.scrivx file. This is the XML file that contains all the info about your project. We want to edit this file manually, so you’ll need to open it up in a text editor such as Wordpad. This will give you a document that looks something like…
-
<?xml version=”1.0″ encoding=”UTF-8″?>
-
<ScrivenerProject Template=”No” Version=”1.0″ Creator=”SCRWIN-1.5.3.0″>
-
<Binder>
-
<BinderItem ID=”0″ Created=”2011-05-09 15:14:24 +0000″ Modified=”2012-03-27 08:07:29 +0000″ Type=”DraftFolder”>
-
<Title>Manuscript</Title>
-
<MetaData>
-
<IncludeInCompile>Yes</IncludeInCompile>
Etc…
Step 3: Find the part of the file that talks about the Collections in the project. The first part of the file describes the contents of the binder. The next bit talks about all the Collections you have, whether set up as a saved search, a recent search, a traditional “collection”, or the main Binder itself. The easiest way to find this part is the search for the text string <Collections>, which will take you to somewhere looking a bit like this in the document…
- </MetaData>
- </BinderItem>
- </Binder>
- <Collections>
- <Collection Type=”Binder” ID=”{d1810e54-eda5-4e70-8314-77ed1fd1376c}” Color=”0.901961 0.917647 0.933333″>
- <Title>Binder</Title>
- </Collection>
- <Collection Type=”RecentSearch” ID=”{52f71a7a-5d84-407d-a5fc-f4de997b97ce}” Color=”0.901961 0.901961 0.980392″>
Step 4: Find the Binder collection and the naming string. You’ll see in the example above that there is a collection that is shown as Type=”Binder”. This will be followed by some info, including the part which names the collection:
- <Title>Binder</Title>
Note, this may well say something else (eg <Title>Navigation Console</Title>) if the project was set up while you were using Scrivener in an interface language other than English (eg, http://www.pigfender.com/index.php/2013/01/writing-sci-fi-with-scrivener-for-windows/ ).
Step 4: Change the title. You need to change the text between the <Title> and </Title> strings to reflect what you’d like the binder to be called. In the initial example, this became
- <Title>NIAD 2012</Title>
Step 5: Save and exit the document. Assuming you are sure you’ve not changed anything other than the above text string, of course.
Step 6: Test the change by opening the updated project in Scrivener.
Have fun.